
Let me say a few words about what I wished to achieve with this synth.
I wanted to make a compact multi-purpose synth, with its own "voice",
therefore it doesn't have many windows and the features are limited
to what I personally would use.
Having all controls in one page allows me to quickly tweak the sound,
with the drawback of a somewhat unconventional layout and a busy GUI.
But I hope that once the user has familiarized with the layout
she can enjoy to "improvise" complex sound design in real-time.
Note: So far this operation manual is just a little more than a draft.
You have the 'help on screen'
whenever you hover the mouse on a Sinmad knob or slider.
Please send your questions using https://nusofting.com/support/ that will help to expand this manual with the the info you exactly need. Thanks.
Sinmad is audio plug-in (virtual instrument) compatible with many VST and AU hosts,
both on Mac and PC.
Sinmad is a VA synth but beside the standard subtractive resonant filter it uses a resonant delay network. Hard to describe its sound by words, despite the few controls the array of possible sounds is wide and potentially wild. Some people descibe it as 'organic', chaotic.
Main features:
- Multiple oscillator, including standard waveforms and FM, sub oscillator, noise and the one-shot sample player with special functions called HIAT [harmonically integrated attack transient].
- Main subtractive filter (VCF), plug a fixed HP pre-filter and bit depth reduction.
- Polyphonic delay matrix , a highly configurable feedback delay network (FDN) featuring three delay lines per voice [E.G. your can have 9 modulated comb filters in a 3 notes chord].
- Three envelope (2 x ADSR, 1 x AR) and two LFOs.
- Custom equalizer : HP, Notch, LP , Hi boost :to shape the timbre before the effects sections.
- Effects : # saturation limiter combo ('sat lim') to emulate amp high gain, # 'echobis' a double delay effect with sync to time and pitch functions, # reverb in two flavors.
- MIDI controls : pitch-bend 24 st range, assignable modWheel (CC1), assignable aftertouch, assignable keytracking
- Microtuning (per octave) editable on GUI.
The oscillator is anti-aliased and can play eight voices or mono, and features octave and fine pitch controls.
The output of each voice is stereo via the delay matrix, which features a stereo spread knob.
The ADSR envelopes are loopable: two, three or continuous repeats.
Those envelopes are routable (used to modulate) to various targets, this should be clear on the GUI, as they are 'env 1' and 'env 2'.
The GUI is fully drawn by vectors and resizeable, featuring an oscilloscope and peak meters. And eight colour schemes are available to fit your mood and taste.
An extended Tool-tip display provides information for each control at mouse-over.
Therefore, hopefully, you don't need to read a lengthy manual to learn what a knob or a slider is for.
The preset system is cross-platform, the files use the YAML format so they are very easy to read and edit if needed. Moreover, the preset names can support the complete international character set.
Notes for the presets management.
There are two main groups of presets, the "Factory" ones and the "User" ones.
The GUI functions allows you to load any preset, but to save and overwrite
only the "User" ones.
The presets are saved individually in human readable files with .yaml extension.
To explore the "User" folder, when you need to add or delete User presets files, you must use the relative item in the Options menu. Open that by clicking on the |?| at the top left of the GUI and choose "explore users presets".
Had you done that, the Explorer (on Windows), or the Finder (on Mac), will open the "User" presets folder. There you can add or delete the YAML preset files.
The presets you add there will be showed in the pug-in presets menu on the ToolBar, after you have selected "User Presets" in the banks menu, on the left.
Note that you can also rename a preset by opening its YAML files in any text editor.
For consistency you may also like to rename the YAML file with the same new name.
You are allowed to arrange the "User" presets in subfolders, the subfolders name
will be shown in the banks menu. Currently there's no visible distinction between
Factory banks and User banks in the menu, so we suggest that you name your subfolders like
"User - [the name you chose here]".
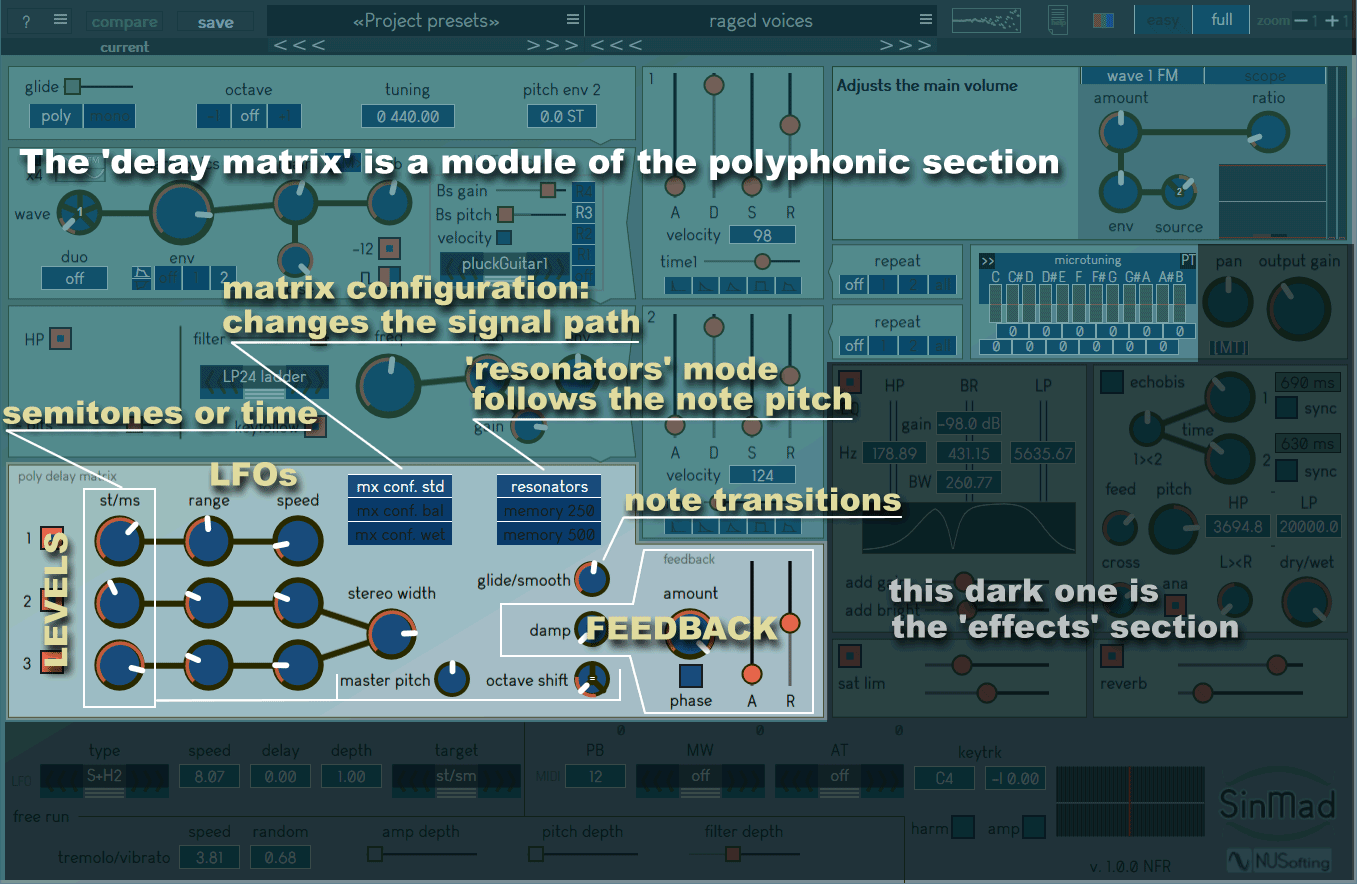
About the delay matrix.
The delay matrix is made of three delay lines (comb filters if you like) feeding into each-other, each delay line is modulated by a LFO, the shape of the LFO is a kind of smoothed sample&hold, pseudo random. A key point is that there is one delay matrix per note (or voice), so if you play for instance a 3 notes chord you'll be playing nine delay lines modulated with nine LFOs. Since the max voices is set at eight so far, for eight notes playing at the same time, with the delay matrix active and modulated, you have 24 delay lines and 24 LFOs running.
Next thing to learn is that the delay lines can be tuned relatively to the frequency of the played note. That happens when the |memory| switch is off. You can tune each delay (comb filter) from zero to -24 semitones. At zero the delay line will have the same length of of cycle of the wave from the oscillator, hence resonating at the same frequency. The amount of resonance is given by the feedback level and its envelope. With "st" at -12 the delay line will resonate one octave lower, and so on. So you see that with three delay lines per note and 24 semitones range for each delay you can create a great number of possible spectral variations, but the delay lines as said above also feed into each-other, so when you use more than one delay line you actually multiply the resonances.
Note that the feedback signal in the delay matrix is saturated
by a waveshaper therefore the higher the feedback level the more harmonics it
will generate, getting into distortion. The phase switch inverts the feedback
signal creating more dispersion and reducing the modulations from the LFOs.
The delay matrix can have various configurations, from a "triple chorus" per voice to highly randomized resonators, or tuned relatively to the note played.
The delay matrix can also do multiple slapback echoes.
The feedback control of the matrix can go from zero to extremely saturated and it's modulated by its own envelope.
Note that "damp" is effective when Feedback is high, since the resonances created that way can indeed be damped.
When the |memory| switch is on then the "st/sm" knobs display their values in milliseconds, now the delays line are no longer tuned to the oscillator frequencies and you can use the delays for echoes (up to 500 ms) or fixed resonances (when few ms are used).
Depth (from zero to 10 ms) and Speed (from zero to 12 Hz) knobs adjust the modulation for each delay line. You can use those for subtle flanging, wide chorus or wild modulations, depending also on how you set the delay lines. The factory presets, should give you some examples.
The "poly delay matrix" first appeared in Sinnah synth
as polyphonic 3D chorus and resonator effect.
With "resonator" I didn't mean it was playable
as a physical modeling tuned instrument, rather that each voice,
played by the main oscillator, could have its own tuned resonances or 3D
chorus effect. The delays did follow the note pitch but with
a smoothed glide that depended on the amount of modulation
given by the three random LFO in the matrix.
Since now it's used in the much more complex Sinmad,
[which also has it's own little physical modeling generator
(HIAT/Burst)], this "poly delay matrix" has shown its limits (and
bugs). Looks intuitive that you would want to
use the matrix as instrument on its own now.
Therefore I modified the algorithm to be also usable like that,
however still with some limitations.
Understanding Sinmad's modulations is paramount for enhanced sound design.
As many as ten modulation sources are featured in the 1.1 release. Some of them are simple and dedicated to one or two targets, others have more options.
# 1) The ADSR envelope always modulates the amplitude of the sound as you may expect. Moreover it can be routed to change the "wave" number and to modulate the "harmonics" parameter amount. Note that if the "link" switch below "noise" is on, the parameter "noise" will also be modulated. Note also that when the envelope is routed to "harmonics" you have the maximum effect when the "full" switch is on and the "harmonics" knob is turned hard right.
# 2) The delay matrix has three dedicated LFOs, one for each delay line. Each of those features a single smoothed random waveshape, similar to the so-called "sample & hold", and modulates the delay time (or tuning, depending on the "memory" switch). The depth of modulation is controlled by the "range" knob, whose value is displayed in milliseconds. The rate of the LFO is controlled by the "speed" knob, which displays its value in hertz.
# 3) The delay matrix feedback amount is modulated by its own AR envelope, which allows to fade in and fade out the amount of feedback. Note that the AR ranges of this envelope are greater than those in the amplitude ADSR.
# 4) The LFO in the "tweaks" zone is the most versatile of the modulation sources. The five controls for the LFO are:
P-1) "type": a menu to select the type of waveshape to be used. There are nine to chose from: "Λ" for a triangular waveshape, "/" for a ramp up waveshape, "Π" for a square waveshape, "\" for a ramp down waveshape, "~" for a sine waveshape, "noise1" for filtered noise source, "S+H1" for standard randomized "sample & hold" source, "noise2" for more filtered noise source, "S+H2" for smoothed randomized "sample & hold" source.P-2) "speed" : a box slider to adjust the LFO rate in hertz for the periodic waveshape and fine tunes the relative filter for the "noise1" and "noise2" waveshapes.
P-3) "delay" : a box slider to adjust the delay applied to the LFO depth, in seconds. The depth is faded in from zero to the selected depth.
P-4) "depth" : a box slider to adjust the amount of modulation. Note that the display can change according to the selected LFO target. When the value range is 0.0 .. 1.0 it means that at 1.0 the target is modulated from zero to the value set in target control. For instance if the target is "harmonics" and its knob is in the middle position, with LFO depth at 1.0 the "harmonics" will be modulated from zero to that middle value. When the value of the "depth" display is negative (where available) the phase of the LFO waveshape will be inverted, that allows some subtle variations.
P-5) "target" : a menu to select the destination of the LFO modulation. Currently in Sinmad 1.1 there are eight LFO targets, this will be expanded in the future versions.
# 5) Sinmad 1.1 has five MIDI controls. These are the velocity sensitivity for the
ADSR envelope, the Pitch-bend range, the ModWheel (CC 1) routing, the Aftertouch
routing and the keytracking (note number to level).
ModWheel (MW) always modulates
the target value from zero to the value set by the relative knob.
Aftertouch
(AT) modulates the target value in a similar way but with a reduced range appropriate
for each selected target.
The keytracking (keytrk) scales the value of the
target relatively to the note played. There are two keytracking controls: one
to set the center note (the one that will not be affected). The other one adjusts
the slope of the curve that maps the level per key to the scaling of the target.